Showing posts with label crafty kids. Show all posts

Monday, April 11, 2011

Color in Motion!

Have I mentioned that I love Chattanooga lately? If not, I love Chattanooga! It's truly a great little city, with tons of fun things happening all the time. Most are cheap or free, yay! Meaning they work really well with my current "we're going to have a blast for pennies" theme.

So MG and I went to a totally free kids class last Saturday at the Hunter Museum of American Art - she had a blast. It was called "Art in Motion" and they held it right in the middle of the museum. Pretty brave on their part if you ask me! The curator discussed "Phenomena Royal Violet Visitation" by Paul Jenkins with the kids and then an amazing creative movement teacher helped them make up a dance about the painting. I loved how they let the kids figure it out for themselves instead of giving them the "proper" answers. So cool! And of course I was excited that the artwork was super big and colorful... talk about a simple explanation of a great piece!!
-HAPPY MOVING ART-


Monday, March 21, 2011

Crafty Kids - Spring Shower Curtain Bangles!

Well folks, we unpacked storage this past weekend. Yup. For any of you that have ever had a storage space, attic, basement or even a closet, you know how scary this can be. After all the dread it turned out to be quite fun. Honest! I found all kinds of goodies including old photos of our early days in New York and some of my kid's preemie baby clothes. It's hard to believe they were that teeny!

Anyway, I also found a bunch of home stuff that we used to stage our house in Southport. Including some really great shower curtain rings - exciting, I know! So when I went to change out the el cheapo ones, both kids had rings stacked up their arms. Which got me thinking... how to make them into a fun project?

WHAT YOU'LL NEED:
• cheap plastic shower curtain rings
• white glue
• fun paper napkins or tissue paper
• a junkie paintbrush

WHAT TO DO:
Cut up the napkins or paper into 1 inch squares (no need to be perfect about it). Paint enough glue onto a ring to stick one of the squares on. Continue until the whole ring is covered. Then coat the ring with another layer of glue as a varnish. Let it dry for a couple hours and ta-da, a fun kid's sized bangle! You could add glitter, gems, buttons, etc. Tons of fun for a princess party craft and super cheap!

PS - Because this involves glue and some skill, I would recommend this craft for ages 3 plus
-HAPPY REPURPOSED HOME GOODS-


Sunday, February 20, 2011

Sharpie Marker Tie-Dye Tutorial

Ok folks, as promised, here's a quick tutorial on how to tie-dye using sharpie markers. We did this at Craft Social Workshop last week and it was a blast! Tons of colors and great ideas... it's always fun to see what crafty people come up with when you show them a new technique and then shut up. Usually the results are way cooler than if you tell them what they should create. So here's the technique:

WHAT YOU'LL NEED:
• Sharpie markers
• 100% white cotton tshirts, socks, undies, etc
• rubber bands
• a jar
• eyedropper
• 91% Isopropyl alcohol (at the drug store)

WHAT TO DO:
This is so easy that it actually makes a great kids craft and is much quicker than regular tie-dye. Just be sure to keep the windows open. Place the jar inside the shirt and position the top where you'd like the dye to go. Secure it with a rubber band around the edge. Now comes the fun part, but don't picnic once you've started the process (aka - don't take your time, be a bit speedy). Using the sharpies, draw dots, lines, etc on the fabric. Fill your eyedropper with alcohol and begin dropping in the middle of the circle. I usually start with approx 10 - 15 drops and then see if it needs more. As the marker reacts to the alcohol, it begins to bleed or "dye". The colors will blend together and will dye up to the rubber band edge. You can do one big design or go crazy and dye the whole item. There's no right or wrong! The really cool part is that the "dye" dries very quickly so no 24 hour wait. And, because sharpie is permanent, there's no need to worry about dye bleeding in the washer, yay! Enjoy!

-HAPPY COLORFUL TIE-DYE-


Wednesday, January 19, 2011

Crafty Kids - Glitter Suncatcher!

There are few words that strike more fear in a mom's heart than "glitter glue". It looks so innocent and sparkly, but it has a way of sticking to every surface other than paper! Well, this year Santa generously brought MG a mega 16 pack of glittery glueiness. I figured there must be a fun project where she could squeeze out all the glue she likes with less chance of an "accident". So here it is - the upcycled glitter suncatcher!

WHAT YOU'LL NEED:
• A clear lid (we used one from Pringles)
• Glitter glue
• A piece of ribbon or yarn
• Tape or a glue gun
• A suction cup (nice but not necessary)

WHAT TO DO:
I covered the table with paper towel and let MG squeeze all the glue she liked into the lid. She, of course, wanted it to be "mermaid colors". You could encourage your little one to make "stained glass", a picture of themselves or they could make a bunch of solid color lids to create a rainbow. Then let the glue dry overnight. Once dry, glue or tape a ribbon loop to the back of the lid. It's now ready to hang in the window using the suction cup. If you don't have one, just tape it up. And there you have it, glitter glue success! Very simple, lots of sparkle and they look really pretty when they're hung up. Plus MG was beyond happy. Yay!!

-HAPPY GLITTER EXTRAVAGANZA-

Friday, August 13, 2010

Glitter Hair Goodies

Having a little girl who loves sparkles usually means that all things involving glitter are a necessity. For example - tutus, princess dresses, thrift store old lady sweaters, fairy wings, anything with sequins (and I mean anything), glitter shoes of all sorts, and the ever popular sparkle flower hair accessories. I'm sure you must know a little one like this?!

So you can imagine the pure excitement when MG spied some "fancy" hairbands and barrettes at the store the other day. And then you can imagine the pain and agony when I told her $5.99 for a sparkle flower was too much. Ugh. I felt terrible! Then I realized we could easily make our own version for virtually nothing. A little elmers glue, dollar store flowers and hair accessories, glitter, and viola! MG had a blast gluing and sprinkling glitter and I think they look pretty great. Phew! Another cheap craft to the rescue! Ooo and a white version of this would be great for crafty wedding/bridal hair...

-HAPPY SPARKLE FLOWERS-


Sunday, August 1, 2010

Crafty Kids - Doodle Bean Bags!

I love Summer! We've been spoiled with endless days of great weather and swimming, but every now and then we have a doozy of a storm. And when I say doozy, I mean thunder booming within inches of our roof and lightening that looks like fireworks. It's really cozy and pretty but explaining to little ones that you can't swim is a bit tricky. So what to do when it's pitch black outside at 3pm? Craft of course! So here's a crafty kids project for a rainy day...

DOODLE BEAN BAGS:
What you'll need:
- a sharpie marker
- fabric scraps (at least 5 inches square)
- double-sided fusible webbing
- beans or rice
- a little one that's bored

Ok, this is really easy and lots of fun. All you need to do is cut some white or light fabric into 5 inch squares. Iron fusible webbing onto the back. Then, if you're feeling brave or desperate, let your little one doodle on the fabric with the sharpie (be sure to tell them to leave room on the edges for sewing up the bag). Meanwhile, cut the bag fabric into 5 inch squares. Once the doodles are done, cut them out and iron them on to the bag square. Then put the 2 right sides of fabric together, sew 3 sides to join, flip right side out, have your child fill with beans and sew together the remaining side to close. To keep MG busy while I hand-stitched the last seam I had her count beans and name the doodle guys. Then we had a bean bag tossing extravaganza. So much fun and the lack of swimming was long forgotten. Hooray!

- HAPPY RAINY DAY -


Monday, March 29, 2010

Crafty Kids - Mini Terrarium

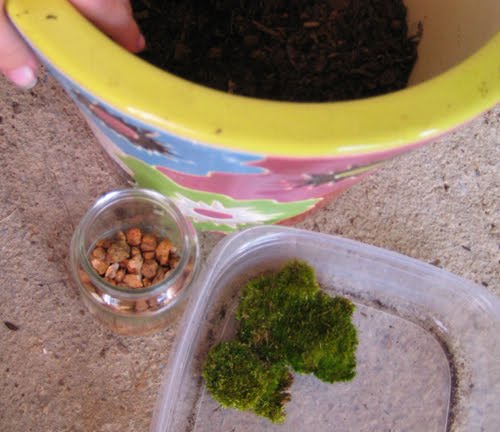
Spring is in the air and the trees are covered with lime green leaves - hooray!! With that in mind, poor little MG made a major request a couple of days ago... she wants us to buy a "house with some dirt". Agreed, I miss my garden desperately! I can't wait to find a house that has lots of digging to be done. So in an effort to play in some dirt, I thought it would be fun to make a mini terrarium out of a baby food jar. It was fun, easy, for all ages and free. Major bonus!

WHAT YOU'LL NEED:
• Baby food jar or small glass container
• moss (we found ours in the woods)
• some small rocks (pea-sized)
• a little bit of dirt
** You can add a small plastic trinket for decoration as well

This is about as easy as it gets folks, so no excuses about not being crafty! MG and I went hunting in the woods for some moss at the base of a tree, a bit of soil in the pathway and some rocks near a stream. Once we had all our supplies, we poured rocks in the bottom of the jar, then layered in the soil and finally some moss on top. After our mini garden was planted, we watered it with a teaspoon and sealed the jar. That's it. Seriously. It's sitting in the kitchen window happily growing... and it doesn't need any care or watering again. Happy Spring!

-HAPPY TINY GARDEN-


Sunday, November 22, 2009

Handmade Christmas!

Christmas is huge for me. I'm not kidding, I get giddy just thinking about it! So anyway, many jingle bells ago, my family decided to do handmade-only Christmases every other year. It was so much fun that nowadays most gifts are handmade regardless of which year it is. So, I've decided to run a short series featuring projects that can be given as gifts. Some will be easy like this one and others will be a tad more advanced (ex: scissors or hot ovens required). I hope you enjoy creating some of them and I'm sure they'll make happy gifts!

HC Project One - SOLO Bead Necklace

This little project is fast, fun and easy for a little one to create. It would be the perfect gift for a mom, grandma, sister, aunt, etc. Just customize with a bead that best suits the person. If you're feeling brave in the craft store, get your kiddie involved in picking one.

Ok, so how to? All you need is a single bead and a "necklace with open crimp end" kit. I found mine at here, but I'm sure you can find one at Michael's or JoAnn's. Open the kit, have the kiddie thread the bead onto the necklace, thread the raw end of the chain through the crimp, trim to desired length (I prefer 16 inches) and crimp closed. TA-DA, a pretty chic and very wearable gift - unlike a macaroni necklace! Though they are fun!

- HAPPY HANDMADE NECKLACE -


Friday, October 23, 2009

Crafty Kids - Bounce!

Okay so this is a bit of cheat (according to my own rules), but I had to make this a Crafty Kid project just so that I could share the fun... A couple of days ago MG and I had a blast making a bouncy ball from a kit. Who knew these things existed?! Well not me. Auntie Lindsay sent it cause she's awesome and cause MG is lucky to have her!

So I had my doubts about whether it would work or not, but it was amazing. All you do is click the mold together, pour in the fun colored tidbits (I'm sure there's a more official name for them, I just don't know it), let it sit in water for 10 minutes and ta da! It was the perfect amount of involvement combined with wait-time for an almost 3 year old. And I got to feel like a mad scientist minus the crazy hair. Oh and bonus, it actually bounces just like those super high bounce balls we had when we were little! If you're looking for a fun party favor, birthday present or rainy day distraction (for young & old), this is definitely a happy solution. I think they could even pass for office party supplies, hmmm...

oops, I almost said "happy bouncy balls" but that doesn't quite work does it?! yikes. How about:
- BOUNCY HAPPINESS - Much better!


Monday, April 27, 2009

I spy with my little eye...

... a really fun crafty kids project! MG has been "I-spying" all over the place lately, so I thought it would be fun to turn it into a free tutorial. And, since we're trying to save moola, I figured it would be an added bonus to make it a recycled art project by only use goodies from around the house. Who doesn't love that?!

What you'll need:
- a clear egg carton
- any tiny goodies you can find (one of each thing - screw, paper clip, hairband, toys, button, dime, etc)
- rice
- packing tape or a glue gun
Place the rice and goodies into separate bowls. Then have your little one scoop the rice into one side of the carton. As they do this, let them add some goodies to each cup every now and then. Once the rice is level with the 1/2 egg cup (see pic) and all the goodies are added, close the carton and secure in place with packing tape or a glue gun. Now you're ready to play! If your kids are still little like MG, have them try to spy what they can find. If they're older, keep a list of all the goodies and see if they can find them all (big folks can have fun doing this too). Both games are great because they encourage curiosity and you could theme yours by what you put in it. For example - "Princess" with sparkly things or "Handy Guy" with washers, nails, etc. Happy spying everyone!

PLEASE NOTE - this craft has tiny parts so it's for kids ages 2 & up


Wednesday, April 15, 2009

"So-Fari" Away Hat

Just to mix it up a bit, here's a little mid-week Crafty Kids project. MG went to a great party last week and the favors included a "so-fari" hat & "oculas". When we got home she was determined to paint her hat and I thought, why not? Let's just say that afterwards she explored all day and went to bed wearing them. Yeah, no amount of convincing was going to change her mind! Since she had so much fun, thought your kids might too.

What you need:
- a safari or any other straw hat (these were from Oriental Trading Co.)
- paint & brush, anything works
It's a simple one folks ... break out the paint and brushes and let your little one go to town on the hat. They'll love designing their own exploring equipment and, if they're older, encourage them to deck it out. Maybe add a headlamp or compass. Once it's dry (a hair dryer will help it along), blaze a trail and go on safari. You never know what they could discover!

- HAPPY HATS FOR LITTLE EXPLORERS -


Monday, April 6, 2009

Crafty Kids - Cupcakes in Bloom

Sorry that Crafty Kids is a day late, work has been super busy. How about we think of it as almost a week early instead ;) Anyway, this craft celebrates Spring and would make a great Easter gift for moms, grandparents and friends. It's also fun for kids of all ages to create. Why not make a whole garden of them?!

What you'll need:
• unused cupcake baking cups
• paint in a color that makes you happy
• green pipe cleaners
• extras - paintbrush & scissors
Have your little one paint the insides of the cupcake cups. After they're dry, snip a little hole in the middle of all your cups and thread the pipe cleaner through. Get creative stacking different combinations, there are no rules. To secure your flower, make a small bend in the pipe cleaner under the flower and in the inside as well. Create a bunch and give them freely!

- HAPPY FLOWERS IN BLOOM -


Sunday, March 22, 2009

Crafty Kids - Chirpy O's

Spring is here - finally!!!! So to celebrate, this week's craft welcomes back the birds. It's super simple and uses things you probably already have in your house. Bonus!

CHIRPY O'S (aka - a great excuse to get outside and welcome Spring)

What you'll need:
- Cheerios or another O's cereal (I love Trader Joes Strawberry O's...hey, they're pink!)
- Pipe cleaners or florist wire
Have kids thread O's onto the pipe cleaner (snacking while threading is highly recommended). Once there's a bunch threaded on, bend the pipe cleaner into one of your favorite shapes and tie a piece of ribbon or yarn for hanging. Run outside, have your kids find a great branch and hang up your Chirpy O's creation. Take a few laps in the yard and keep an eye out for the happy snacking birds.

-HAPPY SPRING TO YOU-


Sunday, March 15, 2009

Introducing Crafty Kids - Crazy Crayons!

I'm so excited to unveil Crafty Kids - each weekend will feature a free and easy craft project for you to make with your kids. Hopefully it will encourage a bit of family time and a love of art...or maybe it'll help with boredom on a long day...we've all had some of those!

CRAZY RECYCLED CRAYONS (aka - what to do with all the broken crayons lying around)

-Gather all your kid's broken crayons
-Remove wrappers and break into 1 inch or smaller pieces
-Have kids fill an old cupcake pan or Ikea silicone ice tray with crayons (don't use for food again - I got mine at the thrift store for 25 cents)
-Heat oven to 150 degrees
-Bake approx 20 minutes or just until crayons melt into shapes
-Place in freezer 10 minutes
-Pop out crayons and go coloring crazy!

-HAPPY CRAFTY KIDS, MAKE FAMILY TIME-